Cub Scout or Youth Ages 8-10
Make sure you look at the next days adventure to make sure you have the right materials! Remember you do not have to finish every days adventure that day, some might take a few days to complete, or you can just mix and match each day up...NO RULES, Just Have FUN!
Every Morning
Wash Your Hands Challenge - Fun way to make sure you are washing your hands enough throughout the day! What you will need; a stamp and ink pad or a washable marker (you may have to re-apply at Lunch), Stamp or Mark the back side of each hand, the challenge is to have the stamp or mark completely gone by the end of the day, depending on the ink or marker you many have mini-challenges throughout the day. Care Givers can have special rewards for the youth who complete the challenge daily.
|
|
Post your Daily Adventures on our CV-JAM 2020: Cub Scout Sub-Camp Facebook Group! Just Click the ICON below.

|
Week 1
Day 1
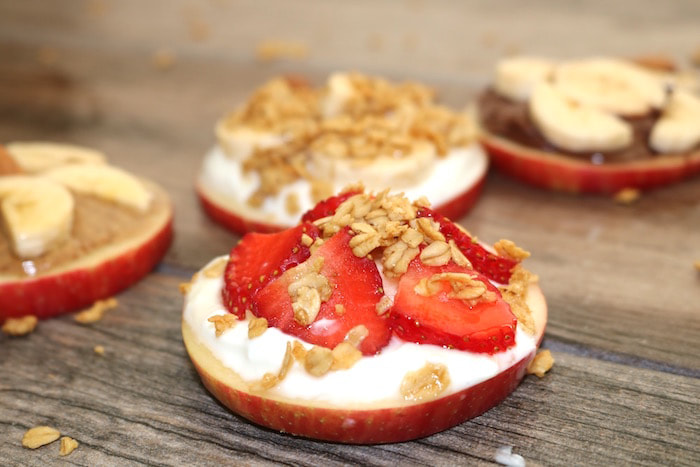
What's Cooking - Have you ever planned the menu for a camp? Well, now’s your chance! As a Family, come up with a healthy menu for a the day. Think about what you like to eat, and what’s easy to make at home. You can even try a crazy new recipe that sounds like something every Cub in the Pack will love. Divide out the meals (and snack times) you have planned, draw a picture of all the meals, use the Canadian Food Guild (see below) to create healthy meals. Pick one of the meals and help prepare the meal with your family. You can be creative and serve your family like staff in a restaurant, Who’s hungry?! Remember to wash your hands before touching food!
|
Plan:
• How many meals do you need to plan for? • What does everyone like to eat? • What meals have you made before? • What would you like to try to make? • Create a grocery list for your meal or snack. Safety note:
• What do you have to do to stay safe when preparing a meal? What hazards should you be aware of? • How can you prevent the spread of germs when cooking and eating? • Do you know anyone that has a food allergies? |
Do:
• As a Family, come up with a menu for the Day. • At home, prepare and enjoy at least one of the healthy meals you came up with. |

Clean Up The Oil Spill - Do you know how to clean up an oil spill? When these accidents happen, plants and animals are in trouble. It’s very important to be able to clean up oil quickly and effectively. Explore different ways to clean up oil, and figure out the fastest and most effective way to deal with a spill.
|
Plan:
Before starting this Adventure, talk about what you knows about oil spills and different clean-up methods. Look around the house and collect the materials you think might be useful in cleaning up an oil spill. Materials:
• Aluminum tray (at least 10 centimetres deep) • Vegetable oil • Kitchen absorbent cloths • Paper towels • Cotton balls • Pieces of nylon net • Nylon stockings • Styrofoam • String • Spoon • 2 eye droppers • Hay • Liquid detergent • Materials from home (optional) • Sand or dirt (optional) • Newspapers (to cover the tables) • Bucket for waste • Rubber gloves • Clock, watch or cellphone for keeping the time. |
Do:
Make the oil spill: To build the ocean, fill the aluminum tray with 3-5 cm of water. Add 5 drops of oil to your “ocean.” This will be your oil spill. Cleaning the oil spill: Your challenge is to clean up the spill. As a family, decide what materials you want to use and how. Compare different methods. Try out three or four different ideas. • Keep track of how much time it takes you to clean the spill. • Come up with a system to record the results of your clean-up so that you can compare different methods. • To test another method, add a few more drops of oil to replace what you cleaned up. Try something new this time. For each method, ask yourself if you were able to clean up all the oil. Create another oil spill: This time, add five drops of detergent directly on the oil. Stir the water to mix the oil and detergent. Record your observations. Containing the spill: One of the first things workers do after an oil spill is try to keep the oil from spreading. Try this yourselves. • Figure out which material woks better to contain the oil. Absorption: In most cases of oil spill clean-up, materials are used to absorb the oil. This means that the material soaks up the oil. Try this yourselves. |
Day 2
Meet The Tribes - Create a world of different people. As a Family, become your very own Family Tribes. Come up with four distinct characteristics for your tribe—a shout, a taboo, a greeting and an new Family Tradition.


Cub Scout World - Personal Achievement Badge
Objective:
I will explore what it means to be a contributing citizen of the world.
When planning your adventure, think about including:
- an adventure in which you learn about or take part in provincial and/or national government
- an adventure that offers service
- an adventure that shows the spirit of the Cub Scout Law, Promise and/or Motto
Here are some ideas to help you start creating your own adventures Note: some of these ideas might be made into more than one adventure.
- Be part of international Scouting through Messengers of Peace. Find out more about this program at Scouts.ca
- Scouts Canada is part of the World Organization of the Scout Movement (WOSM). Where is the headquarters for WOSM? How many countries in the world have official Scouting organizations? What is the WOSM flag? Check out www.scout.org
- The Canadian Scout Brotherhood Fund provides help around the world. Find out more at Scouts.ca and share what you find out with your Patrol or Lair.
- Visit a place of worship, other than one you may attend, and find out what you can about why it is built the way it is, who worships there, how they worship, and more.
- Pick a festival or religious holiday from another faith tradition or culture. How is it similar to or different than a holiday or festival you celebrate? Make or buy some foods from each of the holidays/festivals to share with your family or your Lair.
- What is your favourite story from your faith tradition? Find a story from another faith tradition that is similar in some way. Learn to tell both stories and share them with your family or your Lair.
- What is a food from another culture that you’ve always wanted to try? Find a place where you can taste that food or make it at home.
- Learn how to say Hello, Good-bye and Thank you in several different languages.
- With an adult’s help and with your parents’/guardians’ permission, participate in a Jamboree On the Air (JOTA) or Jamboree On the Internet (JOTI).
- When and where did Cub Scouts first start in the world? in Canada?
- What other countries have Cub Scouts? Find out about what they do at their Cub Scout meetings, their promise, law, motto, uniforms. What is familiar? What is unique?
- What is a country you have always wanted to visit? Plan a possible future trip to that country. Where would you visit? What would you eat? Where would you stay? What is the climate like? What kind of clothes would you need to take? Try out some of their food which you might find locally.
- Keep a photo journal of a visit with your family to another country. Share your experience and your journal with your Lair or Pack.
- What is the United Nations? How does Canada participate in the United Nations? In what ways does the UN help children around the world?
- Find an international penpal through the ScoutsAbroad page of the Scouts Canada website.
- How does the climate of where you live affect the kind of clothes you wear? Find out about different kinds of clothes around the world, why they are worn, and how they are appropriate to the climate.
Day 3
Referee - Games are a lot of fun, but sometimes a good time is spoiled over an honest disagreement. While sporting officials (like referees or umpires) can make mistakes like anybody else, they tend to make pretty good calls. Because referees don’t play in the game, they are focused on making sure that the game is played fairly. As a Family, divide into two teams, decide on a game to play and challenge another team to a competition. Everybody should already know the rules of the game or create a brand new family game. Choose one person from your team to be a referee, and invite the other team to choose one of its team to be a referee too. The two referees will work together to agree on calls so that every other person can enjoy a fun, fair game.
|
Plan:
• What game will you play? How will you decide? • How will the teams choose the referees? • What equipment is needed for the game? • What equipment is needed for the referees? • When and where will you play the game? • Will you review the rules so that everyone has the same understanding? Safety Note:
• Do not run with a whistle in your mouth. If you trip and fall or get hit in the mouth, you can damage your teeth. • How can the two referees work together to stay safe while keeping an eye on the game? |
Do:
• Choose a game to play and select a referee from each Team. • Play the game. Show respect to the calls the referees make. If the referees make a mistake or two, keep in mind that their mistakes are honest ones. Nobody is perfect! |
Germs! - Do you know how germs are spread? More importantly, do you know how to keep germs from being spread? Learn how germs are spread by using Glo Germ and a black light. The Glo Germ powder can’t be seen without the black light, so it gets around just like real germs, which are too small to see. Put some Glo Germ powder on some (not all) equipment for an activity. For example, you might put some powder on a few markers and then take time to draw pictures, or put some on a ball and play a game. When you’re done your activity, use the black light to see how the “germs” have spread! Then try to wash up, and see if you’ve done a good job by again using the black light. Below are other experiments you can try if you cant get the Glo Germ Products.
|
|
|
Day 4
Lost And Find Me - Take your next game of Hide-and-Go-Seek to the next level! As a Family, you’ll need to make a map. You can create a map of your house, backyard or try this out in the neighbourhood. Choose a place to hide, and then come up with a clue for the other Family Members. It’s important that the other family members can read and understand the map to find you. For example, if you wants to hide out behind your couch in your TV Room at your house, you can provide a fun and challenging hint to the other members of your Family: “Twenty Five from the front door , and Eighteen Steps north of the Bathroom.” If the rest of the family can find the bathroom on the map, then they shouldn’t have too much trouble finding your hiding place. Once they find you, it can be another family members turn to make a clue and hide themselves!
|
Plan:
• Do you have maps of the area? Can you make one? • What are the rules for this Adventure? Safety note:
• What will you need to do to make sure this is a safe Adventure? • What guidelines will you need about where it is safe to hide and where it is safe to look? |
Do:
• When you’re trying to find your family member, make use of all your senses. Keep your eyes peeled and listen for the other family member, and keep an open mind when puzzling out the clues. |
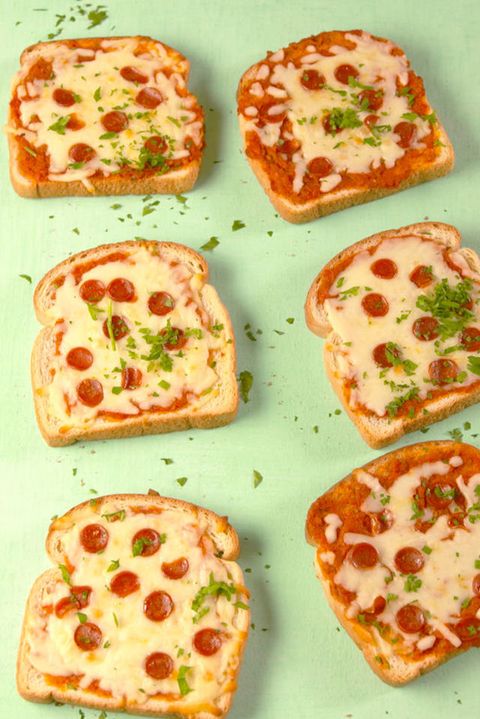
Multicultural Feast - Get to know a little about other cultures by sharing an amazing feast with delicious dishes from far away parts of the world. You and a Care Giver can work together to select and prepare a dish to serve the rest of your family. Remember to wash your hands before touching food!
|
Plan:
• From which country or culture will your dish come? • Create a grocery list or look for items you already have in the home • What utensils and dishes do you need and who will gather them? • Your Family • Learn any new skills required for the cooking—perhaps invite a parent who may be a professional chef or a talented cook to assist Safety note:
• What do you need to remember about safety around stoves or campfires? • Remember to use knives responsibly. • How will you wash your hands and dishes properly? • What are allergies do you or any one you know have allergies? • What respect do you need to show around foods that some cannot eat because of family or religious reasons? |
Do:
• Prepare your multicultural dishes • Dig in! 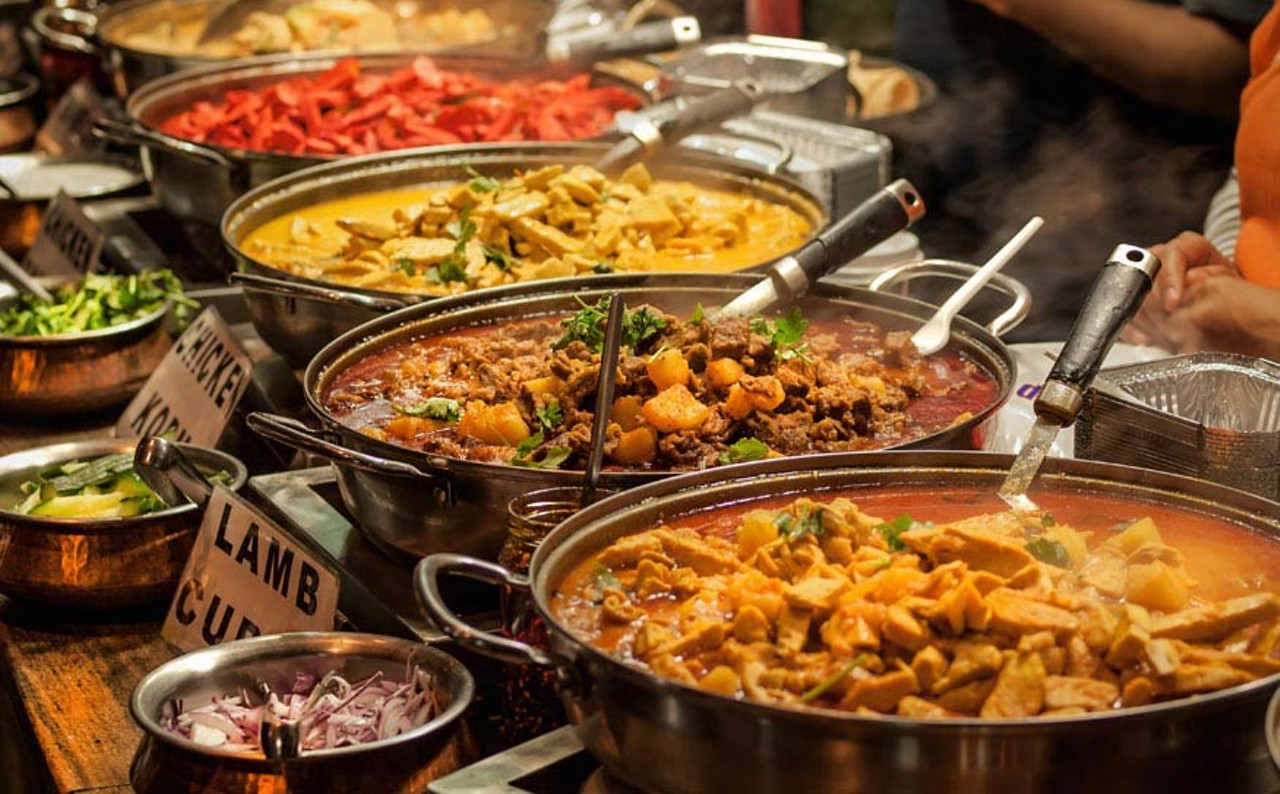
|
Day 5
Camp Fire: Do you know how to build a campfire? Setting things up for a campfire can be easy if you have everything you need close by. Even with all the right stuff, you have to build your fire the right way if it is going to burn well. In a fire ring, start by laying sticks out like a raft on the ground. This will keep your fire away from the cold, wet dirt. Crumple birch bark (gathered from dead trees) on the raft. Put sticks that are no thicker than a pencil on and around the birch bark. Then put sticks that are about as thick as your fingers around the first sticks. Put sticks as thick as a broom handle around all the sticks in the pile, setting them up like a teepee. If you have plenty more wood on hand, then you have a fire that’s ready for your Care Giver to light! Good job!
|
Plan:
• Where can you have a campfire in your community? • Have you helped built a fire before?What can you remember about building a fire? • What help do you need from your Care Giver for this Adventure? • How will you put out your campfire when you are done with it? Safety note:
• Never play with fire. Building a campfire is a good skill to master, but learn about fires with help from adults. • What will you need to put out your fire when it’s time to go? |
Do:
• Gather plenty of good firewood of different sizes, and set up a campfire that is all set to be lit. • Have an Adult help you light the fire, then watch how it burns. • Enjoy your campfire! |
Camp Fire Songs
|
I Met A Bear - Scout Songs
The other day, I met a bear, Up in the woods, A way up there. He looked at me, I looked at him, He sized up me, I sized up him. He said to me, Why don't you run? I see you don't, Have any gun. And so I ran, Away from there, And right behind, Me was that bear. Ahead of me, I saw a tree, A great big tree, Oh, golly gee. The lowest branch, Was ten feet up, I had to jump, And trust my luck. And so I jumped, Into the air, But I missed that branch, On the way up there. Now don't you fret, And don't you frown, I caught that branch, On the way back down. That's all there is, there ain't no more, Until I meet that bear once more. Bon Appetit |
Campfire Song - Sponge Bob Square Pants
I call this one the "Campfire Song Song" Let's gather around the campfire And sing our campfire song Our C-A-M-P-F-I-R-E S-O-N-G song And if you don't think that we can sing it faster, then you're wrong But it'll help if you just sing along Bom, bom, bom C-A-M-P-F-I-R-E S-O-N-G song C-A-M-P-F-I-R-E S-O-N-G song And if you don't think that we can sing it faster, then you're wrong But it'll help if you just sing along C-A-M-P-F-I-R-E S-O-N-G song
Found a Peanut Song Found a peanut, found a peanut, found a peanut last night. last night I found a peanut, found a peanut last night. Cracked it open, cracked it open, cracked it open last night last night I cracked it open, cracked it open last night. It was rotten, it was rotten, it was rotten last night, last night it was rotten, it was rotten last night .Then it continues with the same rhythm: Ate it anyway Got sick Called the doctor Operation Couldn't save me Went to Heaven Met God Wouldn't take me Sent back home Went out walking Had a nightmare Woke Up |
Week 2
Day 6
Mental Health Check-Up!
|
|
|
Robotic Hand - Build a robotic hand to explore how a human hand works. Make adaptations to improve the speed, strength and agility of the hand.
|
Plan:
• How does your hand work? What parts of your body must work together to move your hand? • How do humans rely on robots? • What can robots do that a human cannot? • Take a look at the photographic instructions. • What materials have the Howlers and Scouters prepared before this adventure? Materials:
• Adhesive tape or glue • Scissors and hole punch • Copies of the step by step guide (See Below) • Objects that can be moved with the hand (different shapes and different weights, e.g. empty pop cans, small toy balls, small toys, etc.) • At least 2 m of string • 10 plastic straws with vertical lines. The lines guide where the holes should be punched. The straws should pop back in to place after they have been bent. • Two plastic or paper cups • Wood dowel or old broom handle for the arm Safety Tips:
• What precautions do you need to take when using tools to build your robotic hand? Adults may need to help with cutting or hot glue. |
Do:
Making the Fingers • Take a straw and the scissors. Cut out segments with the scissors or a hole-punch to create knuckle joints. • It is best to keep the holes lined up along a single line of the straw. If the holes curve around the straw, the finger will twist instead of closing on itself when the string is pulled. • Pass a string through the straw. Tape the string to the “pad” of your straw finger, on the same side as the holes. • Test each finger as you go. How many fingers will you build? Making the Palm • Arrange the fingers on a cup to form a hand and tape them in place. You can wrap the tape around the cup a few times to add some support. • To increase the strength of the hand, you can use two cups. Add a bit of glue between the cups to stick them together. Making the Arm • You will need an arm to support the load on the hand. Glue or tape a wood dowel, cardboard tube or an old broom handle to the bottom of the cup. • Organize the finger controls to allow operation of the hand and fingers. Practise with the robotic hand to “train” it to perform certain functions such as closing onto an object. Games • Speed Game – Place various objects on a table and stand back. Use your robotic hand to reach the objects and move them from one table to another. This can be a timed activity, a race or part of a relay. • Strength Game – Try lifting objects of increasing weight. How strong is your hand? The design of the hand will impact how much mass it can lift. Why did some fail, while others showed great strength? |
Day 7
FUN TIME SLIME
|
|
|
Cub Scout Earth - Personal Achievement Badge
Objective: I will explore environment, nature, research and/or leisure activities as they relate to the Earth.
When planning your adventure, think about including:
- an adventure that helps the environment and/or involves an experiment
- an adventure that would be something you would do for fun and/or exercise
- an adventure that takes place outdoors
Here are some ideas to help you start creating your own adventures Note: some of these ideas might be made into more than one adventure.
- Have you ever seen an animal track in the soil? What tracks of different wild animals might you see in your area? Go on a hike with your family in an area where you may see these animal tracks. Can you spot any? Take a photo or make a plaster cast and show your Lair. Try to figure out what animal made the track you found.
- Create a photo collage or slideshow highlighting different types of “earth” in your neighbourhood. How many different types can you find? Take close-up photos and wider photos of the same places. Get your friends in your Lair to guess which closeup shots go with the wider shots. What clues can they look for to help them match the pairs?
- Create three different experiments on soil erosion, such as pouring water on different surfaces like bare soil, soil with plants, sand, sand/soil/rocks, rocks and sand, etc. What is important about erosion, and why is it a big problem? What could we do differently to combat erosion?
- Go to a local garden centre or tree nursery and find out about how different soils help different kinds of plants grow.
- Go on an urban hike and look for signs of pollution on the ground. Organize a service project for your Lair or Pack to help solve this problem.
- Participate in one of these activities(or something similar) that you have not done before: Scoutrees, Re-Vegetation Project, Community Vegetable Garden, a planting project, One Tomato Project
- What is Leave-No-Trace camping? On your next Cub adventure, help your lair or pack learn about and practice Leave-No-Trace. How successful were you at leaving absolutely no trace?
- Learn about and experiment with laying a fire on different types of soil. What do you notice for each soil type (rock, black earth, gravel)? What do you need to consider for safety in each case? Why is it important to avoid building a fire on grass or tree roots?
- There are many different types of roads that cars and bikes which cars and bikes can drive on, such as pavement, gravel, dirt, cement. What are the strengths and weaknesses of each of these materials? Try rolling a ball, riding a bike, pulling a cart and/or driving a remote control car on each of these road materials (in a safe place) to compare how they work.
Need some more ideas?Look at the Trail Cards for Red Flower Camp (Outdoors) and Bagheera’s Hunting Grounds (Environment). Pick an adventure you’d like to try on your own.
Day 8
Thank You! - Today take time to write a note, letter or picture to someone or a group of people in your community that is going above and beyond during this global pandemic; Hospitals and Health Care Professionals, First Responders, Your Local Grocery Store, Your Local Utilities Companies (Electricity, Gas, & Water), Your Teacher or Scouter. Instead of a letter you could make a video and send it to there social media page. Click on the "Thanks" badge to thank a Scouter (Canada Only)!

|
|
Ice Cream Cans - To get that oh-so-good creamy texture, ice cream must be mixed and frozen at the same time. Ice cream makers use a mixing device to keep the ingredients moving while cooling everything from the outside to freeze the liquids. Milk and cream freeze at a lower temperature than water. Salt lowers the freezing temperature of water, creating a below-zero cold layer to freeze the milk into ice cream. Now you get to be the ice cream maker! Combine cream, sugar and different flavours in a container. Put this container in a bigger container full of ice and salt. Then, give the whole thing a good shake – and keep on shaking. The final product will be a delicious homemade treat for you and your whole Family can enjoy.
|
Plan:
• What flavour will your ice cream be? • What ingredients will you need to make your ice cream? • Will you make your ice cream in a can or a bag? • Why do you need salt to make ice cream? Materials:
• Milk, cream or whipping cream • Sugar • Flavouring, such as vanilla, chocolate chips or coconut • Rock salt • Spoons • One large and one small metal can with lids Or several slide-lock bags of different sizes • Tape |
Do:
• Mix your milk, sugar and other flavourings in the smaller can or bag, then seal it up tight. • Place this container in the larger one. • Fill the larger container with crushed ice, adding salt in layers as you go. • Now, shake it up. Roll or shake the can, or give your bag a good shake. • Mix any chunky flavourings about fifteen minutes after you have begun shaking. • After about twenty minutes, your ice cream should be ready to eat! • Grab a spoon and dig in! |
|
|
|
Day 9
Better Bubbles - Take your bubble game to the next level. Design and build your ultimate bubble wand. Do you want to make stronger bubbles that last longer and float farther? Or do you want to create many teeny tiny bubbles? How can you make a giant bubble? The right bubble liquid and bubble wand can make all the difference when blowing bubbles. Try out different combinations of soap, water and other ingredients to make the best bubble liquid.
|
Plan:
• What do you know about making bubbles? • What can you use to make bubbles? • What materials will you use to build your bubble wands? • How could you make bubbles of different shapes and sizes? • What challenges will your members of your Family attempt? The biggest bubble? Strongest bubble? Longest-lasting bubble? Materials:
• Dish soap • Water • Glycerin • Corn Syrup • Tray for bubble liquid • Bubble wands • Scissors • Materials for your bubble wands, such as straws, plastic cups, plastic bottles, pipe cleaners, string etc |
Do:
• Collect any materials you want to use to make your better bubble wand. • Try a few different designs to create the ultimate bubble wand. • Get outside and blow some better bubbles! Safety Tips:
• What do you need to remember to stay safe when you are out in the sun? |
From Seed to Sky - Have you ever planted trees? How big were the trees you planted? Were they little seedlings, small enough to fit in your hand? Or did you plant much bigger trees—maybe even trees taller than you? Most trees come from seeds. If you want to see how a tree grows from a tiny green sprout to a tough little seedling, you and your Family can plant seeds early in the year. By spring, your little trees might just be ready to plant outside. One day, your tree might reach high into the sky!
|
Plan:
• What will you need for this adventure? • Where will you get your tree seeds? • How will you care for your tree? How long will it be before you can plant your little tree? • When and where will you plant your seedling? |
Do:
• Plant a tree from a seed, and take care of it until it’s ready to be planted for good. |
|
|
|
Day 10
Camping Out Training - Get used to spending a night in a tent by setting up your tent indoors or out in your backyard. Have a sleepover with your whole family, but use camping gear to imagine a real Adventure. You wont be camping to far in your backyard or in your basement, there will not be to many bugs to worry about, and it will not matter if it rains, your family can just come back inside. Remember to see what the weather is going to be and camp inside if needed, safety is always the number one priority.
|
Plan:
• When and where will you share your indoor or backyard camping Adventure? • What should you pack? • What will you eat? • What games will you play? • Will you spend any time outside? • How might you help your indoor space have an outdoor look? |
Do: • Have a great indoor camping Adventure!
Safety note: Will your whole Adventure be indoors, or will you play outside before coming in to sleep? Be sure to pack everything you need for time outdoors on your Adventure. You may need a bug spray, a raincoat and a flashlight. What else should you pack? Remember to camp as a family! DO NOT PUT ANY HEAT SOURCE INTO INDOOR or OUTDOOR TENT!
|
|
Indoor Camping Ideas:
|

|
Campfire - Scroll back up to Day 5 and build or reuse the campfire you created. At the end of each week we will be adding on to your camping adventure! Click to button below for more Campfire Songs.
Week 3
Day 11
Gravity Pulls - Compare how quickly different objects fall, figure out what determines an object’s speed in free fall, and try different strategies to make things fall faster and slower.
|
Plan:
• Where will you do this adventure? Indoors or outdoors? • Is there a safe structure from which you can drop your objects? How could you build one? • What objects will you drop? Choose objects that are similar in size and shape but have different masses. Materials:
• One set of unbreakable objects with different weights and shapes for each group (e.g. small stones, tennis balls, ping pong balls, sheets of paper, feathers, pieces of Styrofoam, pieces of wood of different sizes) • Stopwatches • Pencils • At least 20 sheets of paper • Tape or glue • Three garbage bags, three plastic grocery bags and newspapers for each parachute • Treads or thin ropes (at least 1.5 m for each parachute) • Colouring supplies Safety Tip:
• Remember: garbage bags and plastic grocery bags can be very dangerous and should never be put over anyone’s head. |
Do:
Activity #1: What falls faster? • As a Family, predict which objects will fall the fastest. What characteristics of the objects will change how fast they fall? Make a list of your hypotheses. • Drop the objects from a consistent height and time how long it takes them to reach the ground. Record your observations and calculate the speed of each object’s fall. Speed is measured in metres per second, or distance over time. • As a Family, discuss which object fell the fastest. Which one was the slowest? Why? • What causes an object to fall? What other forces do you think are acting on the objects as they fall? Activity #2: Fall Faster! • Take a few minutes to do whatever you want to a piece of paper (without cutting it) to make it fall faster. • Then, drop the paper from a height and see which group’s paper falls the fastest. • After the first round, change your design and try again. Repeat as many times as you want, using a fresh piece of paper each time. • Which designs fell faster? Why? Activity #3: Slow Down! • This time, divide your family into groups of 2 or more, design and build a parachute that slows down a falling object. • Using garbage bags, plastic bags and newspapers, make a parachute and then compete to see which design works best. • If you have time, you can decorate your parachutes. • Which design went slower? Why? |
|
|

|
Rock, Paper, Conflict! - Do you know how to deal with another person when the two of you can’t agree on something? Often, this situation leads to yelling, or even fighting! Of course, there are better ways of handling disagreements. This game will help you to learn and remember the five steps to solving a conflict.
First, draw straws to choose a leader for the game. That individual will review and share the five steps of solving conflicts (below). As a family, walk around repeating the word “conflict” over and over again. When you come to another person who is also saying “conflict”, play a game of rock-paper-scissors. The first person in your pair to win two out of three games can then see the leader of the game to find out what phrase to repeat next while walking around (“calm down”). Again, when you come to another person repeating the same phrase as you, play a game of rock-paper-scissors. When you win two out of three games, see the leader for the next phrase. The first person to go through all five steps of solving a conflict wins!
Five Steps for Solving Conflicts: 1. Calm down. 2. Discuss the problem. 3. Think about solutions. 4. Agree on a solution. 5. Put the solution to work.
|
Plan:
• Who will lead this game? How will you choose? What ways other than drawing straws might work to choose a leader? • What ways can you show what stage everyone is at in the game, other than repeating a certain phrase? • Where will you play this game? • How long will you play? • Who can remind the group how to play paper-rock-scissors? Will you “shoot” on the count of three, or after the count of three? |
Do:
• Play Paper-Rock-Conflict. • Have fun! Safety Note:
• How can you stay safe while moving around in a group to play this game? • How safe is the place where you plan to play this game? How can you make it as safe as possible? |
Day 12
Meditation 101 - Youth are capable of being mindful just like adults and it’s easy to get them to meditate when they’re excited about it! Teaching your child to meditate at a young age leads them on an awesome path to more happiness and health as they grow older. Mindfulness is an awesome skill to cultivate at any age!
|
Plan:
• Do you want to do this meditation indoors or outdoors? • KEEP IT SIMPLE! Meditation is simply noticing what is happening right now. • USE YOUR IMAGINATION! Children learn best through imaginative play. Why not combine mindfulness meditation for kids with using their imaginations? |
Do:
• Find a quite place to meditate! |

Spirituality Award
This award is an alternative to the Religion in Life Emblem, designed for those not a member of a specific faith
This award is exclusive of the Religion in Life Emblem. Youth may earn one or the other, but not both.
Four Areas:
- Self Discovery,
- Interfaith/Culture Discovery,
- Experience/Sensitivity to the wonders of the world, nature, life & death
- Area of Service Action
Requirements:
Self Discovery
• Choose and create one each of the following: a symbol, a story and a song. Tell your Family why they are important to you.
Interfaith/Culture Discovery
• Find one example of similarities and one example of differences between other faiths or cultural groups.
Experience/Sensitivity
• Describe different examples of the diversity of people and cultures in the world while on a hike, trip or about town.
Area of Service
• Do something for others. Assist a Service Agency in a service project.
Day 13
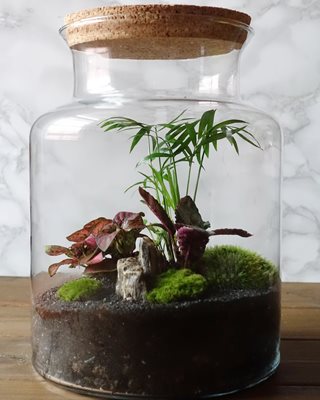
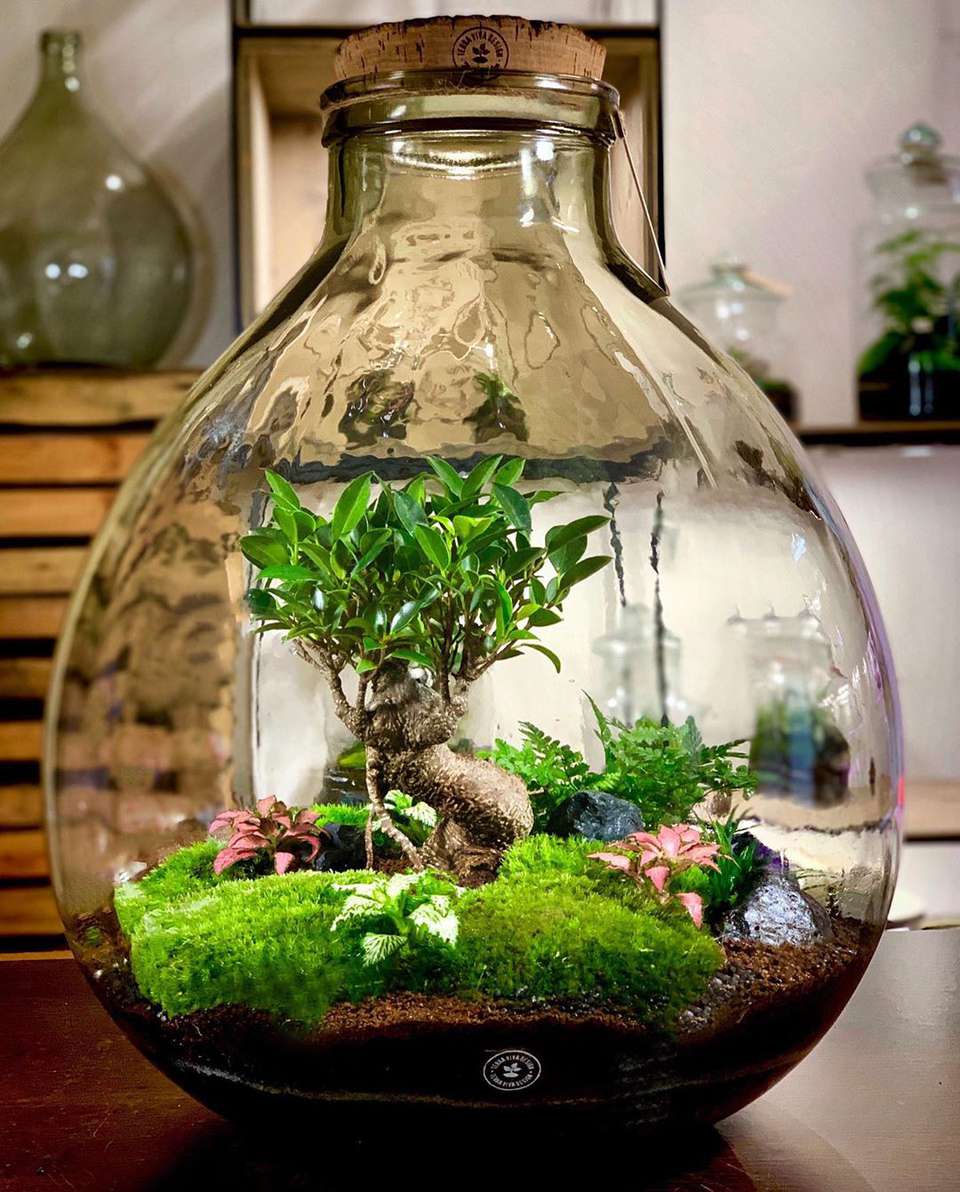
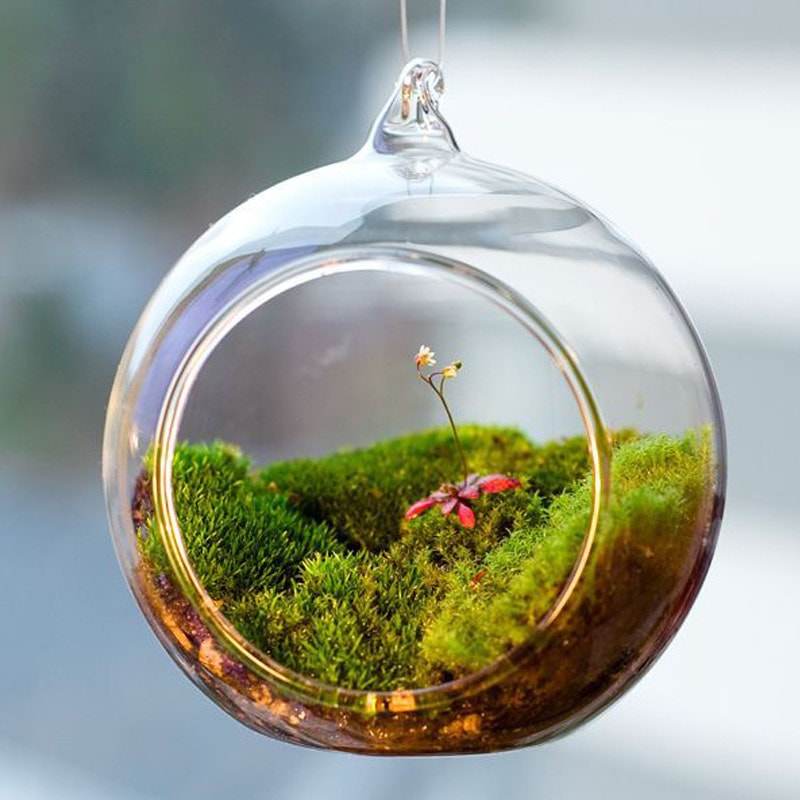
Build a Terrarium - This nature activity teaches children how to build and maintain a terrarium.
|
Materials
|
Directions
A terrarium is a completely self-supporting ecosystem. The plant life replenishes the air with oxygen, light shining through provides the light and power source, and water comes from the moisture in the soil. As the dead leaves fall off, they decompose providing food for the soil. How to make one:
|
Bug Hunt - This nature activity teaches children how to search, capture, and care for bugs.
|
Materials
|
Directions
Have you ever taken the time to observe bugs? They are amazing creatures. They fly, buzz, sting, leap, and even light up.
|
Day 14
Say Cheese - To get started, let's take a minute to talk milk. Milk is made up of proteins, sugars (lactose), fat, minerals, vitamins, and enzymes. All of those things play various roles in cheese-making, but the real key players in the game are the proteins, namely casein and whey.Turning milk into cheese is a matter of changing the properties of those proteins, causing the caseins to coagulate into deliciously soft, milky curds and leaving behind the cloudy, watery byproduct known as whey. Acid-set cheeses require nothing more than a pot, some milk, a thermometer, cheesecloth, and an acid source, such as lemon juice or vinegar. When all's said and done, you'll have what's known as queso fresco in Latin America, paneer in India, wagashi in Ghana, and farmer's cheese in many anglophone countries.
|
Plan
• How will you find out how to make Cheese? • What supplies will you need to make your Cheese? • What equipment will you need to make your Cheese? • Is there other Types of Cheese that your Family could make? Materials:
• Pot • Thermometer • Spoon • Cheesecloth or Clean Sackcloth Dishtowel • Colander • Whole Milk • Lemon Juice or Vinegar • Salt Safety note: • Always have an Adult present when working around the stove. • How can you prevent the spread of germs when cooking and eating? • Do you know anyone that has a food allergies? |
Procedure:
1. Heating milk in a pot, gently stirring continuously, so not to scorch the milk. 2. When the milk has reached anywhere from 165°F to 185°F, take it off the heat. 3. Add in the lemon juice (vinegar can be substituted). 4. Working one tablespoon at a time and stirring gently after each addition, I continue pouring in the acid until the curds separate from the whey. It will look like soft, curly white clumps suspended in a clear-ish liquid, and it will be sudden. Trust me, you'll know when it happens. 5. Once they've separated, take a break. Let the pot sit uncovered for at least five minutes and up to 20 minutes to complete the separation process. 6. Now it's draining time! Ladle the curds into a cheesecloth-lined colander. If you don't have cheesecloth, you can also use a clean sackcloth dishtowel. The finer weave means the draining will take a few minutes longer, but the cloth is reusable and ultimately cheaper if you plan to make cheese frequently. 7. Gather the curds into a ball in the middle of your cheesecloth and press them into a hockey-puck shape. 8. Then, tie the cloth around the cheese, place bound cheese back into the colander, and put some kind of weight on top anything that weighs a few pounds. 9. Let your set-up rest for an hour and a half, or until the cheese has reached your preferred texture—the longer you wait, the firmer it will get. It'll keep for up to a week in the refrigerator, but it's best used right away. There you have it—everything you need to know (okay, and maybe a tiny bit more) to make a basic cheese. Super cool. |
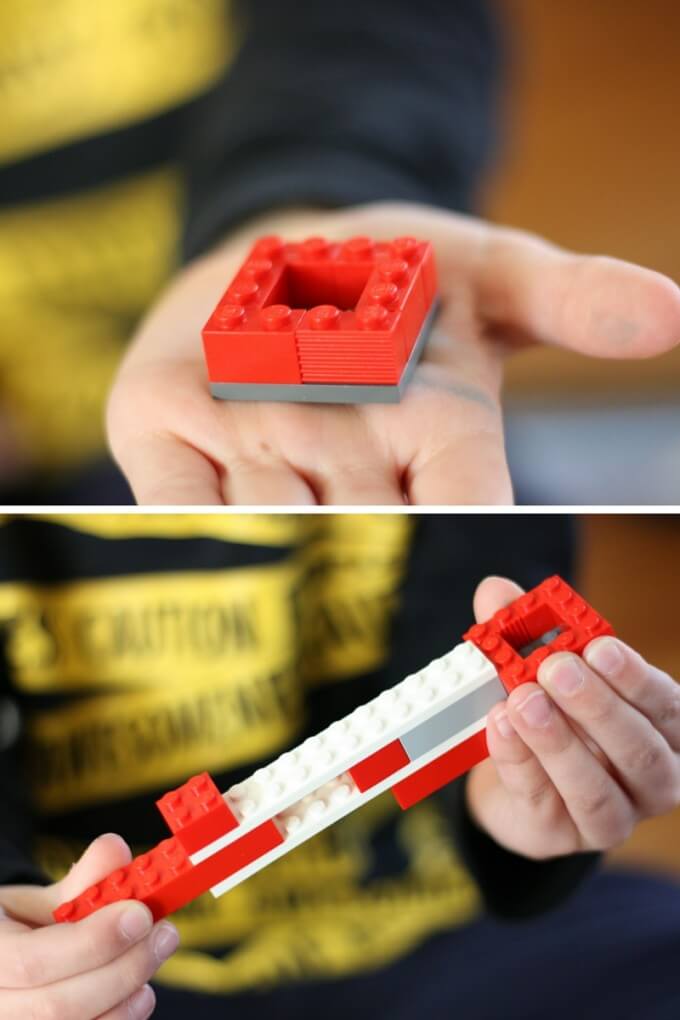
Lego Catapult - built an awesome LEGO catapult using basic bricks for an easy STEM and physics activity. This is fun homemade catapult just about everyone will want to be able to make! As an adult try and not build all the catapult for the youth. Instead, help troubleshoot ideas, ask questions to help when they gets stuck. Sometimes, it’s as simple as redirecting the question back can help to come up with their own solution. Try and come up with your own designs, if you do need help there are so instructions down below. Remember to have FUN!
|
YOU WILL NEED:
1. LEGO CATAPULT BASE
|
HOW TO BUILD A LEGO CATAPULT:
1. Make a single wide wall out of 1×4 and 1×6 bricks across the small plate and attached it to the base plate. 2. Added supports on the front and back with double wide bricks. Notice that we left a gap of 4 studs in the middle. 3. The majority of the base is three bricks worth high and then one extra layer of 1×8 bricks were added onto the top of each side, still keeping the middle clear. 4. launcher to make your own. The red bricks are 2×8. Bucket part is flush with the end of the red brick. The white plate is not under it. 5.The 2×2 brick is used to keep the rubber bands in place. This is where you start experimenting with tension with your LEGO catapult. 6. Modify the design and tension to see how are you can shoot an object. |


Day 15
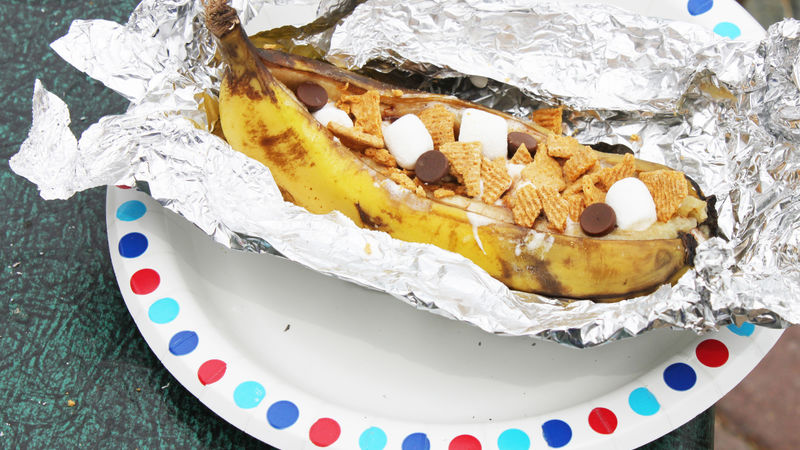
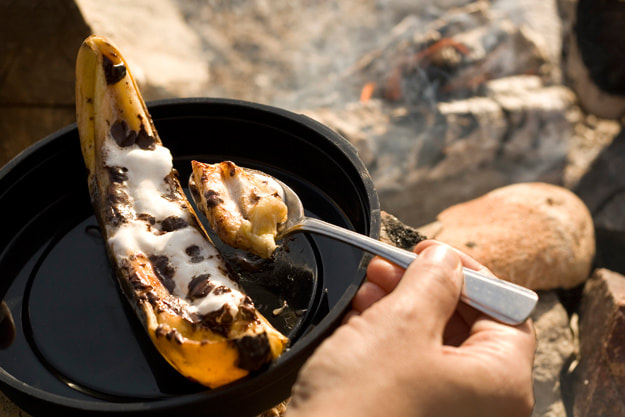
Campfire Cookout! - Campfire Banana Split, "This was a recipe from my old Scouting days. A very easy recipe for all ages that needs little adult supervision. Great for sleep-overs in the basement and your backyard camping trips."
|
Ingredients:
Safety note:
• Never play with fire. Building a campfire is a good skill to master, but learn about fires with help from adults. • What will you need to put out your fire when it’s time to go? • Make sure an adult is helping when using any sharp knifes |
Instructions:
|

Camping Adventure - Scroll back up to Day 5 & Day 10 and build or reuse the campfire you created and pitch that tent or create an indoor tent fort. At the end of each week we will be adding on to your camping adventure!
Week 4
Day 16
Build a Hovercraft - Cub Scouts explore how moving air can power a vehicle. Cubs create a hovercraft using a CD or a paper plate or a foam board and power it by balloons. Once assembled, the youth may race the hovercraft to understand how different elements of the design can affect the speed and direction of the hovercraft.
|
PREPARATION:
• This activity can be done inside or outside. The hovercraft need to run on a smooth surface. • Familiarize yourself with how a hovercraft works. • Youth may need more time for the design and build phases. This Adventure could be done over a few days. THE ACTIVITIES: • Show the family a video of an actual hovercraft. When the video is over, ask the everyone if they know how a hovercraft works. Take time for brainstorming, guessing and discussing. Encourage discussion by asking probing questions. REVIEW:
• This is a great opportunity to use recycled materials. Old CDs and DVDs, soap lids, and other materials can otherwise be difficult to recycle. • Some Background Information on Hovercraft • Hovercraft are supported off the ground by an air cushion. Vents in the hovercraft direct air downwards, creating a pocket of air currents between the craft and the ground. By shifting the direction of the vents, it is possible to steer the hovercraft. A skirt on the bottom of the hovercraft traps the air cushion underneath the hovercraft. • By reducing friction between the bottom of the craft and the surface, the craft is able to glide freely. Think about an air hockey table, and how freely the pucks are able to move across the rink. |
BUILD A HOVERCRAFT!
• There should be enough so that each youth can try building several different types of hovercrafts. • Give hints or guidelines if your youth are stuck, trying not to give away the answer. • As a Family, figure out that the balloon can push the air underneath the body of the hovercraft, they will draw their design on paper. • Explain your design and how it works to an Adult. • Youth can build their hovercraft individually or as a family. It is best if each person will have a hovercraft to race each other at the end of the project. • Invite youth to test their designs and make changes to figure out which one works better. Ask probing questions if they seems stuck. How do the different shapes of the hovercraft influence the motion? How can we hold the balloon up? • Youth can cut out different shapes (such as squares and circles) from the foam board to see which one works best. They can use cardstock or straw to create a cradle for the balloon. • After understanding the initial concept of the hovercraft and building one that works, Youth design a hovercraft that moves in one direction. They can add a horizontal direction to the force of the air by cutting an angled hole in the foam board. The angled hole supplies lift and forward thrust. • They can also test adding dimes on the hovercraft to see how it works if made heavier. |
Day 17
Cub Scout Community
Objective: I will explore what it means to be a helpful, contributing citizen of my community.
When planning your adventure, think about including:
- an adventure in which you explore and take part in your local and/or provincial government
- an adventure that offers service
- an adventure that shows the spirit of the Cub Scout Law, Promise and/or Motto
Here are some ideas to help you start creating your own adventuresNote: some of these ideas might be made into more than one adventure.
- What would it be like to move around your community if you were in a wheelchair? Go on an urban hike and check it out. What obstacles do you see? How are these obstacles dealt with in some places? What more can be done? Find a way for your Pack to help make a difference.
- Think of someone (or more) in your community who works hard and helps many people, but doesn’t often receive a thank-you. How might you offer thanks?
- What is something in your community that needs improving? Is there a fence that needs painting or a place that could use some flowers or a ditch full of garbage that needs to be cleaned up? With permission and appropriate help (and paying attention to safety), do what you can.
- Invite your family or your Lair to join you in volunteering for your community for a day.
- Who are your neighbours? With permission and support from your parents/ guardians, find out about the people who are your immediate neighbours.
- Create or cook a surprise for a friend or family member who is sick or lonely or sad.
- If you could be the mayor of your community for a day, what law would you pass for your community and why? Write a letter explaining your law and your reasons and send it to your mayor.
- Create a scavenger hunt for your Patrol, in which clues are given and the Lairs take photos when they find the place to which the clue leads. Include some places in your community that other Cubs might not know about.
- Is there a foodbank in your community? Arrange to take a tour and find out what kind of food they collect and how they help people.
- Take on the job of managing the recycling for your Pack or your family for a month.
- Create a map of your community that would be helpful to a newcomer to the area. What do you think he or she would need to know in order to feel at home?
- With permission and support from your parents/guardians, plan a picnic or another street party and invite your neighbours.
- Go geocaching in your community. What discoveries do you make?
- Learn some American Sign Language or Braille. What other ways do those who have challenges with sight, hearing or mobility communicate?
Need some more ideas?Look at the Trail Cards for Elephant Turf (Citizenship) and The Swinging Bridge (Active & Healthy Living). Pick an adventure you’d like to try on your own.
Day 18
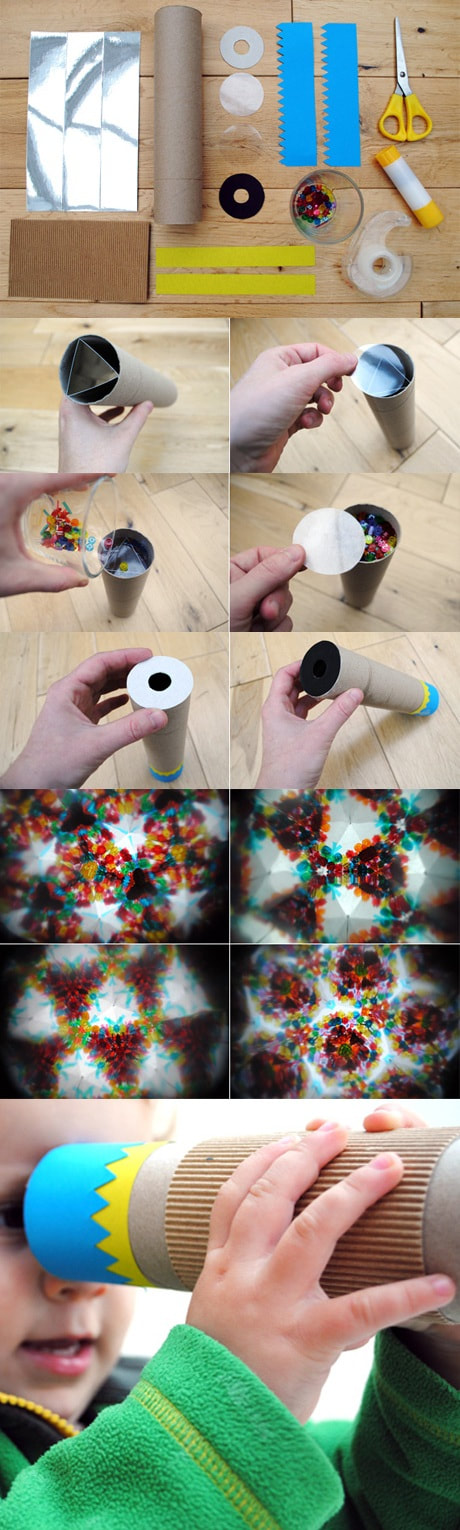
Cub Kaleidoscope - Kaleidoscopes reflect light off and through colourful objects to create beautiful patterns. The image of ordinary objects is reflected on two or three mirrors, through a triangular prism (triangular tube), before it reaches your eye, changing what you see. Build your own kaleidoscope and explore the world of reflected images.
|
Plan:
• Where will you do this adventure? Indoors or outdoors • What will you use to fill your kaleidoscope? • How will you design your kaleidoscope? • How many mirrors will you use in your design? • Do you need to cut any plastic or mirrors? What tools will you need? Do you know how to use these tools safely? Materials:
• Mirror acrylic sheets (or other reflecting material) • Tube (cardboard, plastic or PVC) • See-through material such as a small baggy, plastic wrap or wax paper • Elastic • Glue and tape • Paper/bristle board • Foam pieces • Beads, glitter, sequins or other colourful, see-through or reflective objects |
Do:
• Start with a tube about 20-30 cm in length. This will be the body for your kaleidoscope. • Connect your rectangular mirrors along their edges with tape or glue to create a hollow triangular prism (tube). Change what you see by changing the angle between the mirrors. • Slide the triangular prism into the outer body tube. • For a different look, use two mirrors and a piece of black construction paper to create the triangular prism. • Use black construction paper to make an eyepiece and attach it to one end of the kaleidoscope. • Create a space for your colourful items at the other end of the kaleidoscope. Use plastic wrap, a small baggy, plastic discs or something else. Make sure the material is seethrough, and that you can see shapes and colours through it. • Hold the tube up to one eye and look through it. Turn it and watch your own light show |
|
Day 19
Rube Goldberg Machines - A Rube Goldberg machine uses many steps to solve a simple problem. Roll a ball into a row of dominoes that will collapse onto a lever that will flip the switch and turn on a light-bulb! With your Family, create a complex machine that will solve a simple problem.
|
Plan:
• What do you know about Rube Goldberg machines? The Mouse Trap board game is one example. • What do you know about simple machines? How can they work together to build a larger machine? • What simple problem do you want to solve? This could be something like turning the page of a book or lighting a fire. • How many steps will your machine have? • What will you use to build your machine? • How much time do you want to build your machines? • How will you form your groups? Safety Tips:
• Wear safety goggles to protect your eyes. • Avoid using hazardous elements such as chemicals or flames. |
Do:
• Use everyday objects such as books, marbles, dominoes or balloons to build a Rube Goldberg machine! • Draw a plan to help guide your group. • It can be easier to start at the end and work towards the beginning. • When everything is in place, set your machine in motion! Materials: Building materials can include (but are not limited to):
• Rubber bouncy balls • Paper cup • Paper clips • String • Cardboard and construction paper • Straws • Books • Marbles • Rubber bands • Balloons • Tape • Dominoes • Mousetraps (use under adult supervision) |
Day 20
Honouring Essential Workers - Tonight at 6:30 p.m. as a Family make your way out doors, it could be for front porch, balcony or even just in your driveway and for 10 minutes, make as much noisy as you can; start banged pots, pans, or even rubber bins. Ask your Friends and Neighbours to participate. Use the sounds you make, as a form of appreciation for all the essential workers that are helping out the community through the COVID-19 pandemic. As a Community, you may want to continue making noisy to show your appreciation daily or weekly at the same time.
Closing Campfire - Scroll back up to Day 5, Day 10 and Day 15 and build or reuse the campfire you created, pitch that tent or create an indoor tent fort, make some more delicious camp snacks and sing some songs and tell some stories. Take a look back at all the adventures you have done from your over that past few weeks, your "Scouting from Home" and continue that adventure in new ways with your Sections in the days and weeks to come. Thank you for participating in the Canadian Virtual Jamboree and we will continue to add new program from time to time so please keep checking back or join one of our Facebook Groups, may your Families stay healthy and safe during these times.